
FAQ / Help pages - Controls & Settings
What does the "Make Comment" button do?
The "Make Comment" button creates text where each line of text doesn't expand beyond a certain size (around 650 pixels in width).
It's easier to describe it with an example. Just imagine that you want to write 3 lines of text, something like this:
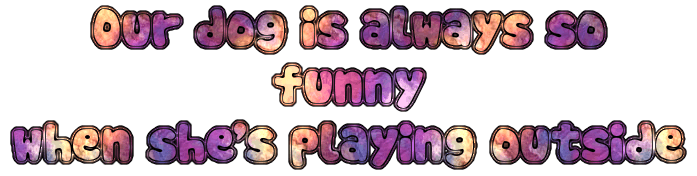
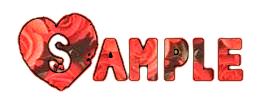
Text made with normal "Make Text" button and Small font size selected
It looks ok, but it could be neater, and maybe you want to emphasise some of the words like "funny".
So you can try using the "Make Comment" button, and try changing the font size to something bigger.
The overall width will be limited to 650 pixels, but where there is space available, the font size on each line will grow bigger depending on the current size setting.
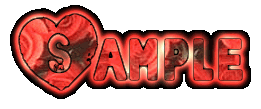
This is with the XXL size selected and using "Make Comment":
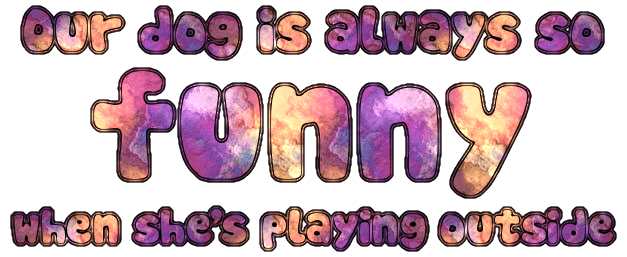
Text made with "Make Comment" button and XXL font size selected
This feature was originally added for making comments to post on social networks, however it can be used for any purpose where the text might look better with this layout. In some cases, such as posting on Facebook, you may need to use this to get a more compact overall image.
(need a smaller sized image with the same layout as the "Make text" version? You can download the large image and easily resize it in an image editor.)
Note: When you press the "Make Comment" button, it will stay in "Comment" mode even when changing sizes, selecting different text styles etc., until you press the "Make text" button to switch back to normal text mode.
It's easier to describe it with an example. Just imagine that you want to write 3 lines of text, something like this:
Text made with normal "Make Text" button and Small font size selected
It looks ok, but it could be neater, and maybe you want to emphasise some of the words like "funny".
So you can try using the "Make Comment" button, and try changing the font size to something bigger.
The overall width will be limited to 650 pixels, but where there is space available, the font size on each line will grow bigger depending on the current size setting.
This is with the XXL size selected and using "Make Comment":
Text made with "Make Comment" button and XXL font size selected
This feature was originally added for making comments to post on social networks, however it can be used for any purpose where the text might look better with this layout. In some cases, such as posting on Facebook, you may need to use this to get a more compact overall image.
(need a smaller sized image with the same layout as the "Make text" version? You can download the large image and easily resize it in an image editor.)
Note: When you press the "Make Comment" button, it will stay in "Comment" mode even when changing sizes, selecting different text styles etc., until you press the "Make text" button to switch back to normal text mode.
How about the "Get Web Code" button?
The "Get Web Code" button uploads the text image file to Imgur, an image hosting site. Imgur then gives us links to the image to use in different ways.
You can copy and paste the "Direct Link" to the image which is like a shortcut to the image that can be used in various places, e.g. posting on Facebook, Twitter etc.
This is also called the image URL, image link or image web address.
You can copy and paste the "Direct Link" to the image which is like a shortcut to the image that can be used in various places, e.g. posting on Facebook, Twitter etc.
This is also called the image URL, image link or image web address.
What does "Preview Background" do?
"Preview Background" simply displays the current text against different types of backgrounds.
This can be useful especially with animated text where you might want to change the background colour to make it look better (see next question).
This can be useful especially with animated text where you might want to change the background colour to make it look better (see next question).
What do the "Background:" and "Solid Bg." options do?
The background option is the colour "swatch" here:
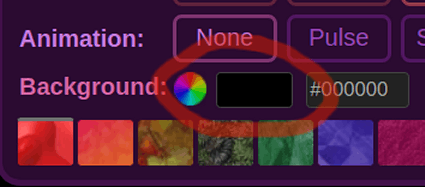
You can click/tap on it to open the background colour selection box:

You can move the crosshair on the left to change colour saturation and lightness, and use the vertical slider on the right to change colour hue.
By changing this, you can get a nice coloured border around your text, if "Solid Bg." is turned off (which is the default).
This works especially well when using the "Super" glow option - see the question below, 'What are the "Glow Effect" options?' for examples.
If the "Solid Bg." (Solid Background) option is checked, the background colour is instead used for the entire background of the image, so the border effect around the text disappears, and there are no transparent parts in the image.
The text should update automatically after the background colour is changed, but if there's a problem you can press one of the "Make text" buttons to update it.
Note: The text doesn't automatically update after changing the "Solid Bg." or "Comment Borders" options. To see comment borders, you'll need to also press the "Make Comment" button.
In some cases (especially with animations), you might need to match the background colour with where you are going to use the image.
For example, if you want to use animated text on a web page with a dark background, then it's probably ok to stick with a black background colour.
But if you plan on using text on a page with a white background, it may be better to try setting the text background colour to white.
This is a way of avoiding the appearance of rough edges between the text and the page background.
You can see the differences in the following examples, the first one is using the normal black background colour, the second one has the background colour set to white, and then the same again but with animated text:
Text with default background colour on white background
Text with white background colour on white background
Animated text with default background colour on white background

Animated text with white background colour on white background
You can see how different background colours can work with your text by using the "Preview Background" button to see how the text appears against different backgrounds.
You can click/tap on it to open the background colour selection box:
You can move the crosshair on the left to change colour saturation and lightness, and use the vertical slider on the right to change colour hue.
By changing this, you can get a nice coloured border around your text, if "Solid Bg." is turned off (which is the default).
This works especially well when using the "Super" glow option - see the question below, 'What are the "Glow Effect" options?' for examples.
If the "Solid Bg." (Solid Background) option is checked, the background colour is instead used for the entire background of the image, so the border effect around the text disappears, and there are no transparent parts in the image.
The text should update automatically after the background colour is changed, but if there's a problem you can press one of the "Make text" buttons to update it.
Note: The text doesn't automatically update after changing the "Solid Bg." or "Comment Borders" options. To see comment borders, you'll need to also press the "Make Comment" button.
Matching text background colour with page background
In some cases (especially with animations), you might need to match the background colour with where you are going to use the image.
For example, if you want to use animated text on a web page with a dark background, then it's probably ok to stick with a black background colour.
But if you plan on using text on a page with a white background, it may be better to try setting the text background colour to white.
This is a way of avoiding the appearance of rough edges between the text and the page background.
You can see the differences in the following examples, the first one is using the normal black background colour, the second one has the background colour set to white, and then the same again but with animated text:
Text with default background colour on white background
Text with white background colour on white background
Animated text with default background colour on white background
Animated text with white background colour on white background
You can see how different background colours can work with your text by using the "Preview Background" button to see how the text appears against different backgrounds.
What does the "Comment Borders" option do?
The "Comment Borders" option adds a mixed black & white border around the text when the "Make Comment" button is used.
Inside the border, the current background colour is used, while outside is transparent.
It looks something like this:
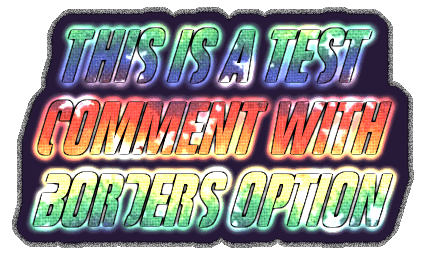
"Comment" style text with border option set, and dark blue background
It can also be useful when you want to have animated text against different backgrounds, as the border provides a sort of neutral visual transition between the page background and the text.
Inside the border, the current background colour is used, while outside is transparent.
It looks something like this:
"Comment" style text with border option set, and dark blue background
It can also be useful when you want to have animated text against different backgrounds, as the border provides a sort of neutral visual transition between the page background and the text.
What does the number "#000000" beside the "Background:" option mean?
This is the current background RGB colour value (in HTML/hexadecimal format). The default is black, which is represented by #000000.
If you want to set the background colour of the text to an exact value, you can type or paste it in here, then press return or tap outside the box to set it.
Otherwise, you can click/tap on the colour swatch to the left of this value to choose a background colour.
If you want to set the background colour of the text to an exact value, you can type or paste it in here, then press return or tap outside the box to set it.
Otherwise, you can click/tap on the colour swatch to the left of this value to choose a background colour.
How do I reset the background colour?
You can just click/tap on it and drag it to black at the far left or bottom-left of the colour swatch (#000000).
What is the purpose of the drop-down box with style name?
This is the "style name" box which just shows the name of the currently selected style.
It changes if you click/tap on a different style, or you can select it to show the list of all available styles, and choose a different one.
The styles include some not shown elsewhere on the page, and also if you scroll down to the end under the "Other fonts" heading, there are a number of styles which support international languages and characters.
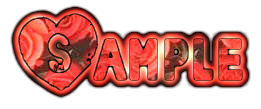
What are the "Glow Effect" options?
The "Glow Effect" options are currently "None", "Outline" and "Super".
Hint: By combining the "Super" glow effect with different background colours, you can create many different and interesting combinations of effects, for example:


"None" just gives the basic text without any effects around the edges.
"Outline" gives a thin outline around the text which makes it look a little more sophisticated.
"Super" gives a stronger glow effect around the text. The colour of the glow effect is based on the colour of the text itself.
Hint: By combining the "Super" glow effect with different background colours, you can create many different and interesting combinations of effects, for example:
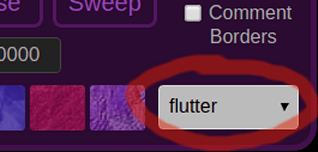
What are the "Animation" options?
The animation options are currently "None", "Pulse" and "Sweep".

Glowtxt Pulse animation

Glowtxt Sweep animation
"None" is no animation effect. The image is created as a PNG file with an alpha channel (semi-transparency).
"Pulse" is a pulsating glow effect. This creates a GIF file.
"Sweep" is a sweeping glow effect from left to right. This creates a GIF file.
Glowtxt Pulse animation
Glowtxt Sweep animation